How To configure bounce setting in Mautic..
Introduction
Mautic being an opensource marketing solution provides you with various features such as email organization through segmentation and sending targeted emails through campaigns with email monitoring. In order to comprehend the impact of your campaign, you need to track how much of your sent emails are being successfully sent and how many emails are being dropped. You can do this by checking bounced emails in your campaign.Why do emails get bounced?
Reasons for getting an email bounce notification can be many; from email address being changed, a domain has changed, the recipient's mailbox is full, etc.Types of email bounces:
- Hard Bounces:- A hard bounce of an email is caused by permanent non-deliverable conditions such as the recipient's email address is missing or invalid. Many other reasons for a hard bounce to occur are the non-existence of the recipient’s domain, unknown recipient, error in typing the recipient’s email address, blocking of your email server by the recipient’s email server, or any kind of network glitch at the recipient’s end.
- Soft Bounces:- If an email message is able to find the recipient’s email server and recognize the address, but it is not delivered to the recipient’s inbox and bounced back before delivery, it is classified as a "Soft Bounce." The reasons might include: the recipient’s inbox is full, the recipient's email server is down for some reason, or the email box is abandoned by the user.
Step 1: Install and enable php-imap extension
If you haven't yet installed the php-imap extension please follow these instructions for the installation:- Install php-imap
$ sudo yum install php-imap // For centos \ RHEL
$ sudo apt-get install php7.0-imap // For ubuntu
- Enable the extension
$ vim /etc/php.ini
- Uncomment or Add these lines
extension=imap.so
extension=curl.so
- Restart the HTTP server
$ service restart httpd\apache // For apache
$ service restart nginx // For nginx
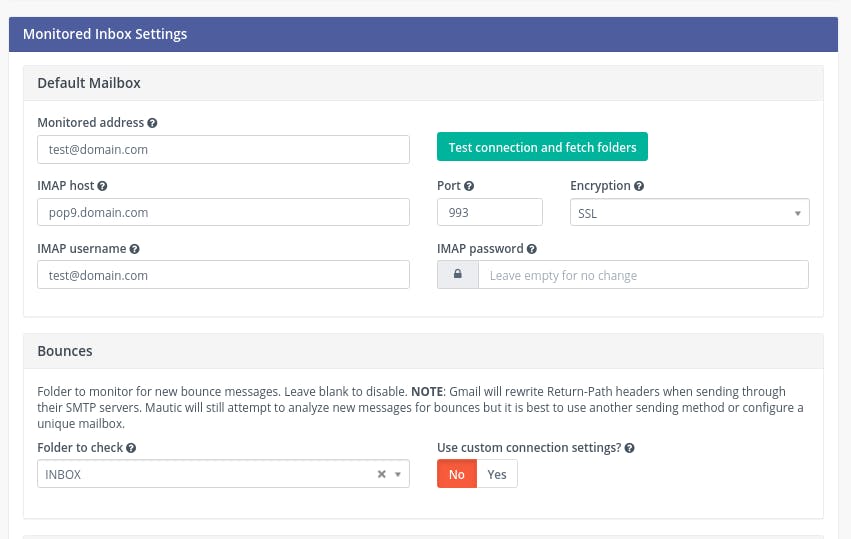
Step 2: Setup Monitored Inbox Settings
Since now we have our PHP IMAP extension enabled we can move onward towards setting up our IMAP inbox with Mautic.- Login to the Mautic panel
- Click on the [cogwheel icon] > [Configuration] > [Email Settings]
- Set these credentials:
IMAP host - The IMAP enabled email server's hostname
Port - Email server connection port [usually 993]
Encryption - Message encryption [usually SSL]
IMAP username - User name of your email account
IMAP password- Password of your email account
- Click on [Test connection and fetch folders] to test the connection and populate the Folders from your email server.
- Bounces - Select the bounces folder from which Mautic will be reading bounce notifications from. This can be set as the Inbox folder of your email directory or you can filter your bounce notifications to the Bounce folder which will be a cleaner way to handle this.
Note:- By any reason you are not being able to see the Monitored Inbox Settings you can do two things to fix this
- Check the php imap option is enabled in the php.ini file or not
- Delete the Mautic cache folder and reload the page
// Mautic cache folder
/mautic_setup_path/app/cache/
Step 3: Setup Cron
Edit the Cron file and put the following Cron in it.$ crontab -e
* * * * * php /path/to/mautic/app/console mautic:email:fetch
Step 4: Create a segment for bounce emails
- Open Segments section in Mautic
- Create a new segment named Bounce emails
- In the Filters section, Select [Bounced - Email] option apply equals operator and set it to yes
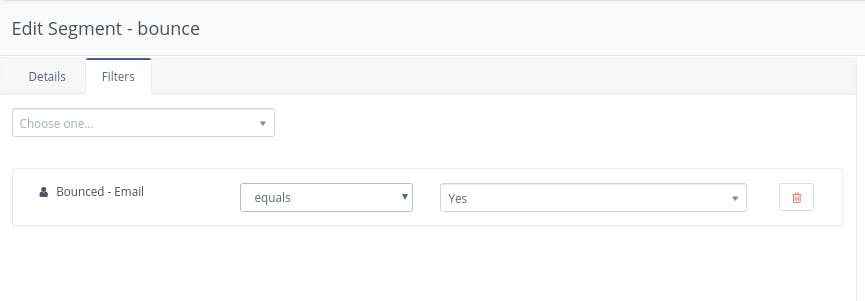
- Save this segment
Step 5: Enable Bounce Forwarding
After you set your IMAP server settings, Mautic would be checking for bounce notification emails in your specified directory. To receive these bounce notification emails, you might have to enable this in your email service providers panel.All you have to do is set the email id which you have specified in the Monitored Inbox Settings to be forwarded the bounce email notifications.
Step 6: Set the webhook to the Mautic mailer callback URL
Depending upon the service provider you use you will have to set the webhook to the Mauitc callback URL.The callback URL would look something like this:
http://<mauic_installation_domain>/mailer/{service-provider-name}/callback
Similar to the IMAP settings you can use this callback URL as a webhook in order to detect bounced emails.
If you are using a custom SMTP service that is not mentioned in the Email service list provided in the [Mail Send Settings] panel, you will not be able to use this. Regardless of that, if you have followed this tutorial until Step 5, you will be able to detect and interact with the bounced email ids into the Bounce segment.
Process
- Mautic uses the configured IMAP mail configuration to detect the Bounced email notifications. This is done by the execution of this Cron mautic:email:fetch
- Mautic uses VERP Variable Envelope Return Path (VERP) to detect emails Return-Path header to check for the bounced email which normally is the from-address you are sending from, which is modified by Mautic
- The format Mautic expects the return-path should be is
youremail+bounce_receiver-email-id@your-domain.com
- When an email is bounced it is sent back with the Return-Path header
- Mautic then uses this detail to set the contact as bounced email.
- The bounce segment that is created by the user is then updated by the contacts that are marked as bounced. This is done after the execution of the Cron mautic:segments:update
Source :- https://pepipost.com/tutorials/author/hitesh_pandey/
Comments
Post a Comment